WordPress Shortcode 即 WordPress 短程式碼功能是在 WordPress 2.5 版本開始被引入,使用者透過 WordPress 短程式碼可以非常方便快速地在編輯文章或頁面的時候插入動態內容,短程式碼的常見應用有插入最新文章、插入廣告、插入音訊影片、插入下載按鈕等。部落格吧給別人製作 WordPress 模板時,透過 WordPress Shortcode 實現了 page 頁面動態插入不同的幻燈片。
下面是 WordPress 短程式碼的詳細介紹及高階應用。
WordPress 短程式碼的使用非常簡單。比如說我們想顯示給定的最新文章,我們可以使用類似下面的程式碼:
[recent-posts]
再進一步的,我們可以透過設定一個引數來控制現實的文章的數量:
[recent-posts posts="5"]
更進一步的,我們可以為文章列表增加一個標題:
[recent-posts posts="5"]Posts Heading[/recent-posts]
1. 簡單的短程式碼
本教程的第一部分,我們將建立下面這個短程式碼的程式碼:
[recent-posts]
建立的過程非常簡單,不需要很高階的 PHP 知識。建立過程如下:
- 建立一個函式,當 WordPress 發現短程式碼的時候會呼叫此函式;
- 透過設定一個唯一的名稱來註冊短程式碼;
- 把註冊的函式繫結到 WordPress 的 action 上。
本教程的所有程式碼都可以直接放到 functions.php 中,也可以放在一個將包含在 functions.php 的單獨的 PHP 檔案中。
1.1 建立回撥函式
當發現短程式碼的時候,它會被一個稱作回撥函式的一段程式碼所代替,所以我們先建立一個函式,從資料庫中獲取最新的文章。
function recent_posts_function() { query_posts(array('orderby' => 'date'<span%20style="color: #339933;">, 'order' => 'DESC' , 'showposts' => 1)); if (have_posts()) : while (have_posts()) : the_post(); $return_string = '<a href="'<span%20style="color: #339933;">.get_permalink().'">'<span%20style="color: #339933;">.get_the_title().'</a>'<span%20style="color: #339933;">; endwhile; endif; wp_reset_query(); return $return_string;}
如上所示,我們查詢資料庫,獲取最新的文章,並返回一個帶有連結的字串。值得注意的是,回撥函式並不列印任何內容,而是返回一個字串。
1.2 註冊短程式碼
現在,我們告訴 WordPress 這個函式是一個短程式碼:
function register_shortcodes(){ add_shortcode('recent-posts'<span%20style="color: #339933;">, 'recent_posts_function'<span%20style="color: #009900;">);}
當在文章的內容中發現短程式碼
[recent-posts]
將會自動呼叫 recent_posts_function() 函式,我們需要確保短程式碼的名字是唯一的,以避免重複。
1.3 Hook into WordPress
為了能夠執行 recent_posts_function() 函式,我們需要把它繫結在 WordPress 的初始化鉤子中。
add_action( 'init'<span%20style="color: #339933;">, 'register_shortcodes'<span%20style="color: #009900;">);
1.4 測試短程式碼
簡單的短程式碼已經準備好了,現在我們需要測試它是否能夠正常執行。我們建立一個新的文章 (或開啟一個已存在的),把下面的程式碼加入到文章內容中的某個位置:
[recent-posts]
釋出文章並在瀏覽器中開啟,你將看到一個執行你最新文章的連結,如下圖所示:

2. 進階短程式碼
2.1 短程式碼引數
短程式碼非常靈活,因為它允許我們新增引數以使它們具有更多的功能。假定我們需要顯示一定數量的最新文章。為了實現這個,我們需要給短程式碼增加額外的選擇來指定顯示最新的多少篇文章。
我們需要使用兩個函式,第一個是 WordPress 內建的 shortcode_atts() 函式,它把使用者的短程式碼屬性與本地屬性結合在一起,並填充到所需要的位置。第二個是 PHP 的 extract() 函式,顧名思義,它提取短程式碼的各個屬性。
擴充套件我們的回撥函式,我們新增一個引數,它是一個陣列,從中我們可以提取到我們需要獲取的文章的數量。我們查詢資料庫,獲取指定數量的文章,並返回一個列表:
function recent_posts_function($atts){ extract(shortcode_atts(array( 'posts' => 1, ), $atts)); $return_string = '<ul>'<span%20style="color: #339933;">; query_posts(array('orderby' => 'date'<span%20style="color: #339933;">, 'order' => 'DESC' , 'showposts' => $posts)); if (have_posts()) : while (have_posts()) : the_post(); $return_string .= '<li><a href="'<span%20style="color: #339933;">.get_permalink().'">'<span%20style="color: #339933;">.get_the_title().'</a></li>'<span%20style="color: #339933;">; endwhile; endif; $return_string .= '</ul>'<span%20style="color: #339933;">; wp_reset_query(); return $return_string;}
如果使用者不指定該選項,1 將是預設值。我們可以新增更多的屬性,使短程式碼接受更多的引數。用這個增強的函式,我們可以指定呼叫最新文章的數量:
[recent-posts posts="5"]
在瀏覽器中顯示時,你將看到最新的五篇文章列表:

2.2 短程式碼中新增內容
我們可以更進一步擴充套件我們的短程式碼,新增一些內容作為引數來傳遞,這將是最新文章列表的標題。為了實現此功能,我們需要在回撥函式中增加第二個引數 $content ,並把它顯示在列表前面的一個 <h3> 標籤中。新的函式如下:
function recent_posts_function($atts, $content = null) { extract(shortcode_atts(array( 'posts' => 1, ), $atts)); $return_string = '<h3>'<span%20style="color: #339933;">.$content.'</h3>'<span%20style="color: #339933;">; $return_string .= '<ul>'<span%20style="color: #339933;">; query_posts(array('orderby' => 'date'<span%20style="color: #339933;">, 'order' => 'DESC' , 'showposts' => $posts)); if (have_posts()) : while (have_posts()) : the_post(); $return_string .= '<li><a href="'<span%20style="color: #339933;">.get_permalink().'">'<span%20style="color: #339933;">.get_the_title().'</a></li>'<span%20style="color: #339933;">; endwhile; endif; $return_string .= '</ul>'<span%20style="color: #339933;">; wp_reset_query(); return $return_string;}
這種短程式碼類似於一個 HTML 標籤:
[recent-posts posts="5"]This is the list heading[/recent-posts]
除了文章列表多了一個標題,其餘的內容和上一個示例是一樣的:

3. 在任何地方顯示短程式碼
3.1 在側邊欄小工具中使用短程式碼
預設情況下,側邊欄小工具是忽略短程式碼的,例項如下:
[recent-posts posts="5"]
如果你把這段程式碼放在小工具裡的時候,你將看到類似下面的結果:

我們可以透過一行程式碼來啟用這個函式,為了使側邊欄小工具支援短程式碼,新增如下的程式碼:
add_filter('widget_text'<span%20style="color: #339933;">, 'do_shortcode'<span%20style="color: #009900;">);
現在不需要修改其他任何地方,重新整理一下頁面看看,側邊欄將會正確的顯示:

同樣的,在評論中啟用短程式碼:
add_filter( 'comment_text'<span%20style="color: #339933;">, 'do_shortcode' );
在摘要中啟用短程式碼:
add_filter( 'the_excerpt'<span%20style="color: #339933;">, 'do_shortcode'<span%20style="color: #009900;">);
4. TinyMCE 編輯器增加短程式碼按鈕
雖然短程式碼可以方便的為文章新增動態內容,但是這對於普通使用者來說可能還是有點複雜,尤其是當引數比較多的時候。大多數使用者對於類 HTML 程式碼並不熟悉,然而要使用短程式碼,他們必須記住具體的語法與引數,因為即使是一個小小的語法錯誤,都可能導致意想不到的結果。
要解決這個,我們可以給 TinyMCE 編輯器增加一個按鈕,使使用者可以透過簡單的單擊來增加短程式碼。建立這個按鈕僅需兩個步驟:
- 為這個按鈕建立一個 JS 檔案
- 註冊按鈕與 JS 檔案
4.1 透過 JS 檔案建立按鈕
JS 檔案是透過 TinyMCE API 來註冊 TinyMCE 外掛的。我們在主題的 js 資料夾下建立 recent-posts.js ,並貼進去下面的程式碼 (需要把圖片檔案也放在這裡):
(function() { tinymce.create('tinymce.plugins.recentposts'<span%20style="color: #339933;">, { init : function(ed, url) { ed.addButton('recentposts'<span%20style="color: #339933;">, { title : 'Recent posts'<span%20style="color: #339933;">, image : url+'/recentpostsbutton.png'<span%20style="color: #339933;">, onclick : function() { var posts = prompt("呼叫文章數量", "1"); var text = prompt("列表標題", "這裡是文章列表標題"); if (text != null && text != ''<span%20style="color: #009900;">){ if (posts != null && posts != ''<span%20style="color: #009900;">) ed.execCommand('mceInsertContent'<span%20style="color: #339933;">, false, '[recent-posts posts="'<span%20style="color: #339933;">+posts+'"]'<span%20style="color: #339933;">+text+'[/recent-posts]'<span%20style="color: #009900;">); else ed.execCommand('mceInsertContent'<span%20style="color: #339933;">, false, '[recent-posts]'<span%20style="color: #339933;">+text+'[/recent-posts]'<span%20style="color: #009900;">); } else{ if (posts != null && posts != ''<span%20style="color: #009900;">) ed.execCommand('mceInsertContent'<span%20style="color: #339933;">, false, '[recent-posts posts="'<span%20style="color: #339933;">+posts+'"]'<span%20style="color: #009900;">); else ed.execCommand('mceInsertContent'<span%20style="color: #339933;">, false, '[recent-posts]'<span%20style="color: #009900;">); } } }); }, createControl : function(n, cm) { return null; }, getInfo : function() { return { longname : "Recent Posts", author : 'Specs'<span%20style="color: #339933;">, authorurl : 'http://9iphp.com'<span%20style="color: #339933;">, infourl : 'http://9iphp.com/opensystem/WordPress/1094.html'<span%20style="color: #339933;">, version : "1.0" }; } }); tinymce.PluginManager.add('recentposts'<span%20style="color: #339933;">, tinymce.plugins.recentposts);})();
我們透過呼叫 tinymce.create() 建立了一個外掛。程式碼中最重要的是 init() 函式,我們定義了一個名字,一個圖示檔案及 onclick() 事件處理程序。
在 onclick() 函式的前兩行,彈出兩個對話方塊讓使用者輸入呼叫文章數量及列表標題兩個引數,然後根據使用者輸入,把生成的短程式碼插入到編輯器中。
最後,TinyMCE 外掛透過 add() 函式新增到 PluginManager 。現在我們已經成功的整合了 [recent-posts] 短程式碼到 WordPress 中。
4.2 註冊按鈕及 TinyMCE 外掛
建立完 JS 檔案後,我們現在需要註冊它和短程式碼按鈕。所以我們建立兩個函式並把它們繫結到合適的 WordPress 過濾器中。
第一個叫做 register_button() 的函式把短程式碼新增到按鈕陣列中,在現有按鈕和新按鈕之間新增分割線。
function register_button( $buttons ) { array_push( $buttons, "|", "recentposts" ); return $buttons;}
第二個函式 add_plugin() 指出 JS 檔案的路徑及檔名。
function add_plugin( $plugin_array ) { $plugin_array['recentposts'<span%20style="color: #009900;">] = get_template_directory_uri() . '/js/recent-posts.js'<span%20style="color: #339933;">; return $plugin_array;}
下一步是新增包含前面兩個函式的過濾器。 register_button() 函式繫結到 mce_buttons 過濾器,這個會在編輯器載入外掛的時候執行; add_plugin() 函式繫結到 mce_external_plugins 過濾器,當載入按鈕的時候執行。
function my_recent_posts_button() { if ( ! current_user_can('edit_posts'<span%20style="color: #009900;">) && ! current_user_can('edit_pages'<span%20style="color: #009900;">) ) { return; } if ( get_user_option('rich_editing'<span%20style="color: #009900;">) == 'true' ) { add_filter( 'mce_external_plugins'<span%20style="color: #339933;">, 'add_plugin' ); add_filter( 'mce_buttons'<span%20style="color: #339933;">, 'register_button' ); } }
當使用者沒有對文章在視覺化編輯器中編輯的許可權時,前面的函式不會執行。
最後把函式勾到 WordPress 初始化函式
add_action('init'<span%20style="color: #339933;">, 'my_recent_posts_button'<span%20style="color: #009900;">);
4.3 按鈕用法
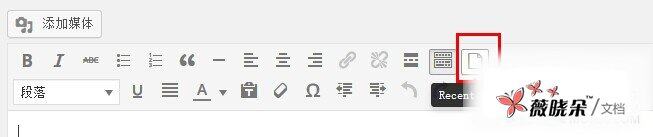
為了檢測程式碼是否正確,我們開啟一篇新的文章,這時一個我們剛剛定義的按鈕是不是已經出現在第一行的末尾了?如下圖所示:
點選按鈕的時候,會彈出對話方塊讓我們輸入呼叫文章的數量:

輸入完點選確定後,會彈出第二個對話方塊,讓我們輸入列表的標題:

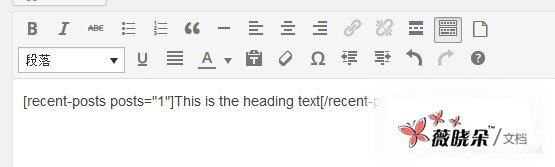
引數留空的話,不會出現在最後的程式碼中。最後,短程式碼會新增到編輯器中: