向 WooCommerce 的結賬表單添加自定義字段,可以使用插件 WooCommerce checkout manager 或者 filter:WooCommerce_checkout_fields,本文介紹的方法非上述兩種,而是使用 WooCommerce_form_field() 函數在訂單備註之後添加自定義字段,並將字段顯示在訂單詳情、訂單郵件和後台中的方法。
代碼測試環境和使用方法
WordPress 3.9.1 + WooCommerce 2.1.2 + 主題 Twentytwelve
所有代碼放在主題的 functions.php 中執行,每段代碼後面的圖片為改代碼的執行效果。
本文原代碼下載 WooCommerce 添加自定義結賬字段源代碼 已下載 270 次
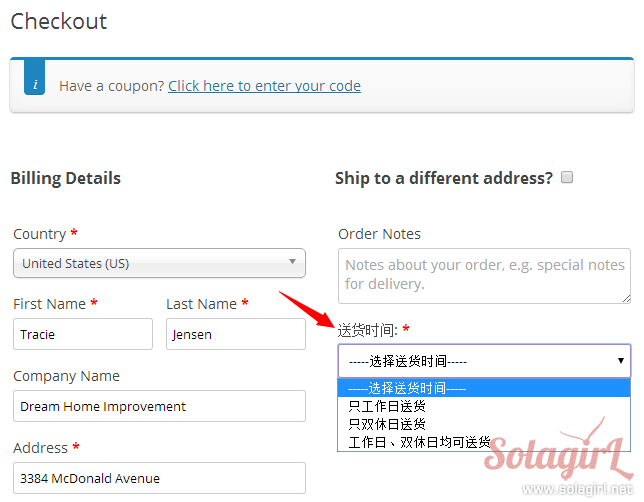
代碼段 1 – 在訂單備註後添加自定義選項
注意在最開頭輸出了帶有 my_custom_section class 的 div,可以用該 class 修改這個區域的樣式,突出該區域。
/**
 * 代碼段 1 - 在訂單備註後添加自定義選項
 */
function my_custom_checkout_section( $checkout ){
	// $checkout stores all checkout fields

	// Section starts, output wrapper or header
	echo '<div class="my_custom_section">';

	// Create a select field
	$options = array(
		'只工作日送貨' => '只工作日送貨',
		'只雙休日送' => '只雙休日送貨',
		'工作日、雙休日均可送貨' => '工作日、雙休日均可送貨'
	);
	WooCommerce_form_field("my_custom_field_1", array(
        'type'     => 'select',
        'class'    => array('form-row-wide my_custom_field'),
        'label'    => '送貨時間: ',
        'options'  => array( '' => '-----選擇送貨時間-----') + $options,
        'required' => true
    ), $checkout->get_value( 'my_custom_field_1' ) );

	echo '</div>';
}
add_action( 'WooCommerce_after_order_notes', 'my_custom_checkout_section' );
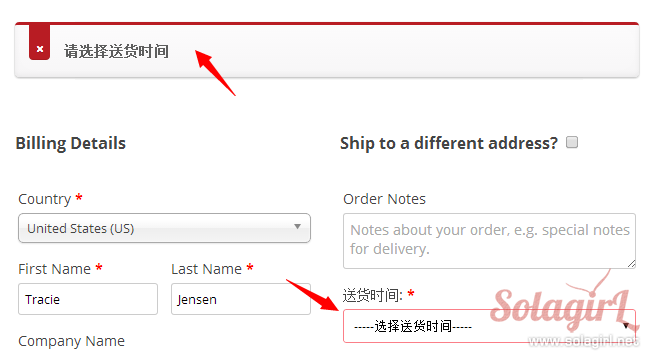
代碼段 2 – 驗證自定義字段
雖然第一步中強調了 required=true,但只是改變了長相,真正的驗證還得自己來。這裏只驗證是否有值。
/**
 * 代碼段 2 - 驗證自定義字段
 *
 * required=true 只改變了長相,驗證還得自己寫代碼
 */
function my_custom_checkout_field_process(){
	global $WooCommerce;

	if( empty($_POST['my_custom_field_1']) )
		$WooCommerce->add_error( '<strong> 請選擇送貨時間</strong>' );
}
add_action('WooCommerce_checkout_process', 'my_custom_checkout_field_process' );
代碼段 3 – 存儲自定義字段的值
用户選擇後還要把值存到訂單中方便以後查詢。 order 的本質是 post,所以 order meta 就是 post meta,用 update_post_meta 存儲,用 get_post_meta 查詢。
/**
 * 代碼段 3 - 存儲自定義字段的值
 *
 * 如果和用户屬性相關,存到 usermeta 表裏,否則存在 order meta(postmeta) 裏即可
 */
function my_custom_checkout_field_save( $order_id ){
	// custom field 名稱,最前面的下劃線的作用是使該 custom field 在後台不可見,必須通過自定義程序顯示
	$ordermeta_name = '_my_custom_field_1';
	// 將送貨時間存到訂單的 custom field 裏
	if( !empty($_POST['my_custom_field_1'] ) )
		update_post_meta( $order_id, $ordermeta_name, wc_clean( $_POST['my_custom_field_1'] ) );
}
add_action('WooCommerce_checkout_update_order_meta', 'my_custom_checkout_field_save' );
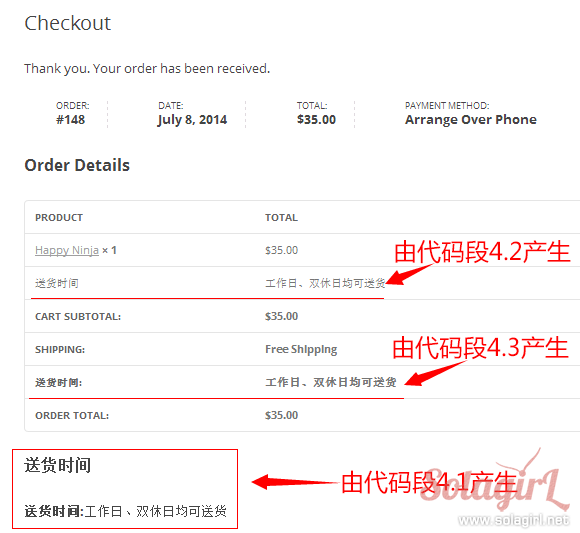
代碼段 4.1-4.3 – 在成功下單頁面不同位置顯示自定義值
提供三個位置顯示,一般只需要選擇其中一個即可。
代碼段 4.1 – 在訂單詳情之後,customer details 之前顯示
/**
 * 代碼段 4.1 - 在 order-received 頁面顯示自定義字段的值
 *
 * 在訂單詳情之後,customer details 之前顯示
 */
function my_custom_field_display_on_order_received( $order ){
	$my_custom_field_1 = get_post_meta( $order->id, '_my_custom_field_1', true );
	if( !empty($my_custom_field_1) ){
		echo '<h2> 送貨時間</h2>';
		echo '<p><strong> 送貨時間:</strong>' .$my_custom_field_1. '</p>';
	}
}
add_action('WooCommerce_order_details_after_order_table', 'my_custom_field_display_on_order_received' );
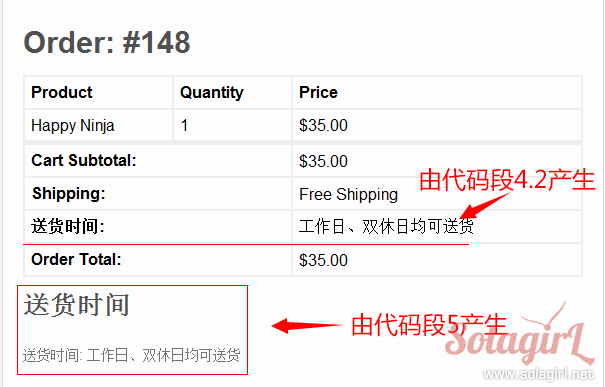
代碼段 4.2 – 在產品列表後顯示
/**
 * 代碼段 4.2 在產品列表後顯示
 *
 * 在 tbody 內、產品列表後顯示
 */
function my_custom_field_display_after_product_list( $order ){
	$my_custom_field_1 = get_post_meta( $order->id, '_my_custom_field_1', true );
	if( !empty($my_custom_field_1) ){
		?>
		<tr><td> 送貨時間</td><td><?php echo $my_custom_field_1; ?></td></tr>
		<?php
	}
}
add_action( 'WooCommerce_order_items_table', 'my_custom_field_display_after_product_list' );
代碼段 4.3 – 在配送方式前面顯示
/**
 * 代碼段 4.3 - 在配送方式前面顯示
 *
 * 在 tfoot 內、 shipping 方式前顯示
 */
function my_custom_field_display_before_shipping( $total_rows, $order ){

	$my_custom_field_1 = get_post_meta( $order->id, '_my_custom_field_1', true );
	$new_total_rows = array();
	if( !empty($my_custom_field_1) ){
		$new_row['my_custom_field_1'] = array(
			'label' => '送貨時間:',
			'value' => $my_custom_field_1
		);

		// Insert $new_row after shipping field
		$total_rows = array_merge( array_splice( $total_rows,0,2), $new_row, $total_rows );
	}
	return $total_rows;
}
add_filter( 'WooCommerce_get_order_item_totals', 'my_custom_field_display_before_shipping', 10, 2 );
代碼段 5 – 在訂單郵件中顯示
若選擇代碼段 4.2 將字段加入訂單詳情頁面,則字段也會自動加到郵件中,就不需要代碼段 5 了。
/**
 * 代碼段 5 - 在 email 中顯示
 *
 * 在 email 的訂單詳情表格之後顯示
 * 若使用 WooCommerce_get_order_item_totals 添加字段,
 * 無需下面的代碼,就可以在訂單詳情表格裏顯示
 *
 * $sent_to_admin - 為 true 表示該郵件發送給管理員
 */
function my_custom_field_order_email( $order, $sent_to_admin ){

	$my_custom_field_1 = get_post_meta( $order->id, '_my_custom_field_1', true );
	if( !empty($my_custom_field_1) ){
		echo '<h3> 送貨時間</h3>';
		echo "<p> 送貨時間: $my_custom_field_1 </p>";

		if( $sent_to_admin ) {
			echo '這是發給管理員的通知郵件';
		}
	}
}
add_action( 'WooCommerce_email_after_order_table', 'my_custom_field_order_email', 10, 2 );
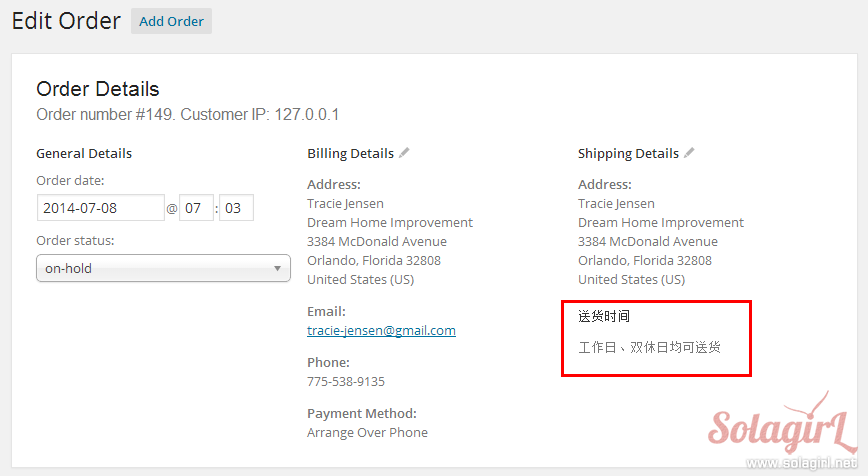
代碼段 6 – 在後台訂單詳情中顯示自定義字段
/**
 * 代碼段 6 - 在後台訂單詳情中顯示自定義字段
 */
function my_custom_field_admin_info( $order ){
	$my_custom_field_1 = get_post_meta( $order->id, '_my_custom_field_1', true );
	if( !empty($my_custom_field_1) ){
		echo '<h4> 送貨時間</h4>';
		echo "<p>$my_custom_field_1</p>";
	}
}
add_action( 'WooCommerce_admin_order_data_after_shipping_address', 'my_custom_field_admin_info' );